
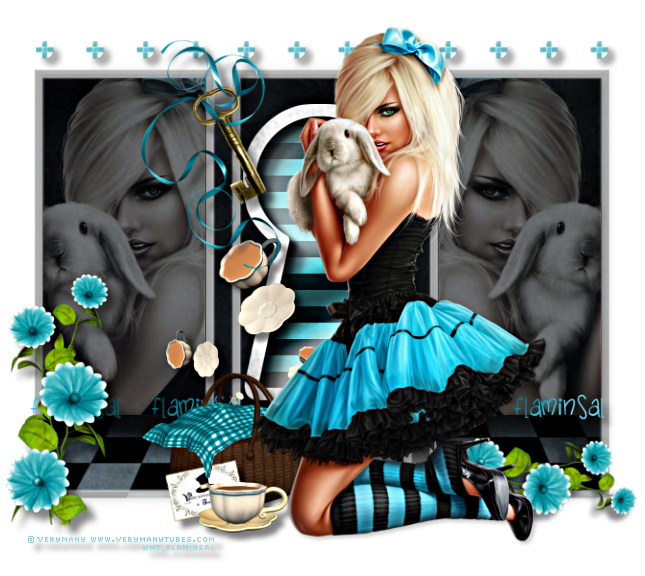
Tea with Alice was written by myself on 16th February 2014. It is my own idea and creation. Any similarity to any other tag or tutorial is co incidental.
Supplies Needed
Tube of choice. I have used the stunning artwork of VeryMany at VeryMany Tubes
Ftu Scrap kit is Alice in wonderland by Vaybs at Designs By Vaybs
Please leave a thank you when downloading :)
Mask wsl148 by Chelle at WeeScotsLass Creations
Font used is Janda Silly Monkey
Filters/Plug ins Used
Tramages - Mo Jellyfish
EyeCandy - Shadowlab
VM Extravaganza - Transmission
Mura's Meister - Copies
Xero - Radiance
Open a new image 700 x 700.
From the kit c/paste the black / chequered paper as a new layer and re size to 95%.
Load mask from disk - Fit to layer.
In layer palette - delete mask - merge group.
Take your rectangle selection tool and create a floating rectangle on the inner of the left rectangle of the mask layer taking the bottom edge just to where the checks begin (See Pic)

C/paste a close up of your tube and position to your liking within the selection.
Selections - Invert - Delete - Select none.
Apply Xero - Radiance to suit and change blend mode to Luminance Legacy.
Duplicate layer and change blend mode of top copy to multiply. Set opacity on both layers to around 40.
Repeat for right side rectangle of mask, mirror the close up so its facing the opposite direction.
From the kit c/paste Element 25 Keyhole re sized to 55%. Position in the centre rectangle of mask.
Adjust - Hue and Saturation - Colorize - 0.
Using magic wand tool click in centre of keyhole to float the inner.
Selections - Modify - Expand by 3.
C/paste paper 5 re sized to 60%.
Selections - Invert - Delete - Select none.
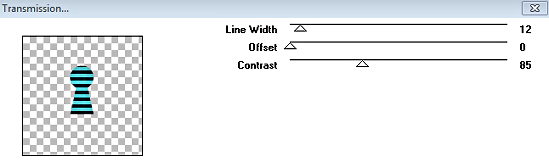
Move paper layer behind keyhole and apply VM Extravaganza - Transmission (settings below)
Then apply Tramages - Mo Jellyfish (settings below)
Apply shadow to keyhole (settings below) I applied 3 times.


C/paste your main tube and position off centre on the right. D/shadow.
From the kit c/paste element 3 - Button. Adjust - Color Balance - Manual Color Correction. Change source from red to target blue. (I took the blue from my tube)
Re size to 12 % and position top left of canvas. Apply Mura's - Copies - Line (settings below)
Shadow and move behind tube layer.

I added my name at this point and used same settings as above changing number to 5 and again positioning behind the tube layer.
From kit c/paste element 16 Blue Flowers. Re size to 55% and place on the bottom left of mask.
Duplicate re size copy to 75% and rotate right by 90 degrees. Place copy bottom right behind tube layer.
Apply a shadow to both.
C/paste element 2 - Picnic Basket. Re size to 60% and position behind tube on the left.
In front of the Basket place element 23 - Invitation re sized to 20%. Rotate left by 12. I used my eraser tool to take out a small triangle piece from the top of the Invitation to look like it was draped by the tablecloth of the Basket.
You will find this easier if you zoom your canvas and have your eraser size set around 6. Shadow.
C/paste element 29 - Tea Cup. Re size to 35% and position above the Invitation, again apply a shadow.
C/paste element 18 - Floating Tea Cups. Re size to 50% and place above the Keyhole layer to the left of and behind tube. Shadow.
Lastly.. place element 24 - Key re sized to 50% at the top of mask to the left of tube. Shadow.
Merge all layers. Crop/re size to your liking. I usually sharpen at this point rather than each separate element as I go along. Adjust - Sharpness - Unsharp Mask 5.0 - 30 -5.
We already added name before merging, so all that's left to do is add relevant artist copyright and tube licence info.
Save as Png.
Thank you for stopping by today and trying this tutorial. I hope you are pleased with your tag.
Sal:)

Selections - Invert - Delete - Select none.
Apply Xero - Radiance to suit and change blend mode to Luminance Legacy.
Duplicate layer and change blend mode of top copy to multiply. Set opacity on both layers to around 40.
Repeat for right side rectangle of mask, mirror the close up so its facing the opposite direction.
From the kit c/paste Element 25 Keyhole re sized to 55%. Position in the centre rectangle of mask.
Adjust - Hue and Saturation - Colorize - 0.
Using magic wand tool click in centre of keyhole to float the inner.
Selections - Modify - Expand by 3.
C/paste paper 5 re sized to 60%.
Selections - Invert - Delete - Select none.
Move paper layer behind keyhole and apply VM Extravaganza - Transmission (settings below)
Then apply Tramages - Mo Jellyfish (settings below)
Apply shadow to keyhole (settings below) I applied 3 times.
C/paste your main tube and position off centre on the right. D/shadow.
From the kit c/paste element 3 - Button. Adjust - Color Balance - Manual Color Correction. Change source from red to target blue. (I took the blue from my tube)
Re size to 12 % and position top left of canvas. Apply Mura's - Copies - Line (settings below)
Shadow and move behind tube layer.
I added my name at this point and used same settings as above changing number to 5 and again positioning behind the tube layer.
From kit c/paste element 16 Blue Flowers. Re size to 55% and place on the bottom left of mask.
Duplicate re size copy to 75% and rotate right by 90 degrees. Place copy bottom right behind tube layer.
Apply a shadow to both.
C/paste element 2 - Picnic Basket. Re size to 60% and position behind tube on the left.
In front of the Basket place element 23 - Invitation re sized to 20%. Rotate left by 12. I used my eraser tool to take out a small triangle piece from the top of the Invitation to look like it was draped by the tablecloth of the Basket.
You will find this easier if you zoom your canvas and have your eraser size set around 6. Shadow.
C/paste element 29 - Tea Cup. Re size to 35% and position above the Invitation, again apply a shadow.
C/paste element 18 - Floating Tea Cups. Re size to 50% and place above the Keyhole layer to the left of and behind tube. Shadow.
Lastly.. place element 24 - Key re sized to 50% at the top of mask to the left of tube. Shadow.
Merge all layers. Crop/re size to your liking. I usually sharpen at this point rather than each separate element as I go along. Adjust - Sharpness - Unsharp Mask 5.0 - 30 -5.
We already added name before merging, so all that's left to do is add relevant artist copyright and tube licence info.
Save as Png.
Thank you for stopping by today and trying this tutorial. I hope you are pleased with your tag.
Sal:)
No comments:
Post a Comment